Traditional boatbuilding
Traditional boatbuilding is based on craftsmanship techniques and construction methods appropriate to the material, which have been developed and tested over long periods of time. Particularly in wooden boatbuilding, precise execution, suitable joints and an understanding of the properties of the material are decisive.
Work such as caulking plank seams or decks, building solid wood masts or riveting with copper nails requires specialist knowledge and careful execution. The following sections explain basic procedures and technical relationships of these classic construction and repair methods.
Caulk
by Fiedrich Brunner
 The craft knowledge has grown through tradition. Among the dying professions are also the ship's carpenter and the wooden boatbuilder. With the last masters and journeymen, the knowledge also sinks into the grave. So it may be good if this description turns out somewhat more detailed. Otherwise, the following applies: “Practice makes the master.”
Caulking is what one calls sealing the plank seams of deck and outer skin.
The Tools
The caulking mallet is made of exotic wood, e.g. lignum vitae, jacaranda. One can also take white or red beech. It is cylindrical, the middle part is somewhat thicker than the ends. The latter are secured against splitting with iron rings that have bevels so that they draw themselves on. The round handle stuck in a bore has a knob-like thickening at the top. It is removed after the work is done.
The caulking irons have the shape of overly wide chisels. The shaft has a round cross-section and a head. The making-up iron is about as sharp as a knife is blunt. The seam-setters have one to three grooves in the “cutting edge”. Accordingly, they are called first, second or third seam-setter.
For seams running along superstructures there are cranked caulking irons, for curves round irons and for butts narrow butt irons. The spanjer has a slanted sole and is used for knocking out old oakum. For wide seams of large ships, one uses the long-handled klamei iron and the klamei mallet for knocking away the oakum.
The pitch ladle is as large as a goeps, has a kind of spout for pouring and is made of copper because the spout can be shaped if necessary and copper holds the heat well. The pitch scraper has a three-sided blade. The deck or ossen plane is about as large as a small jack plane. At each end a rod is passed horizontally through it for gripping, because it is operated by two men.
The caulking stool is about 10 to 15 cm high. The caulking box is an upright box with a side flap and a base area of 20 x 30 cm and just under knee height. All caulking tools go into the caulking box. One can sit on it or also use it as a sawhorse.
The Material
The oakum falls off when hackling the flax. It is soaked in wood tar and delivered in bales, either loose or pressed in layers. The pitch is delivered in barrels or canisters. Cotton is delivered as thread in a ball or hank and is not impregnated. It is used only for fine boat seams.
Caulking
 The work begins with spinning the oakum. The oakum is plucked from the oakum bale and, while sitting, twisted on the knee with the flat hand into a strand just under finger-thick. It must be nicely even and must not contain any thickened areas or hard parts. Then the strand is wound into a ball.
The seams must be dry and clean. Never recaulk over wet oakum!
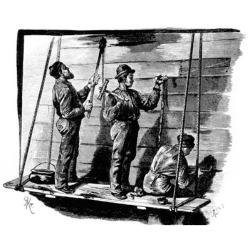
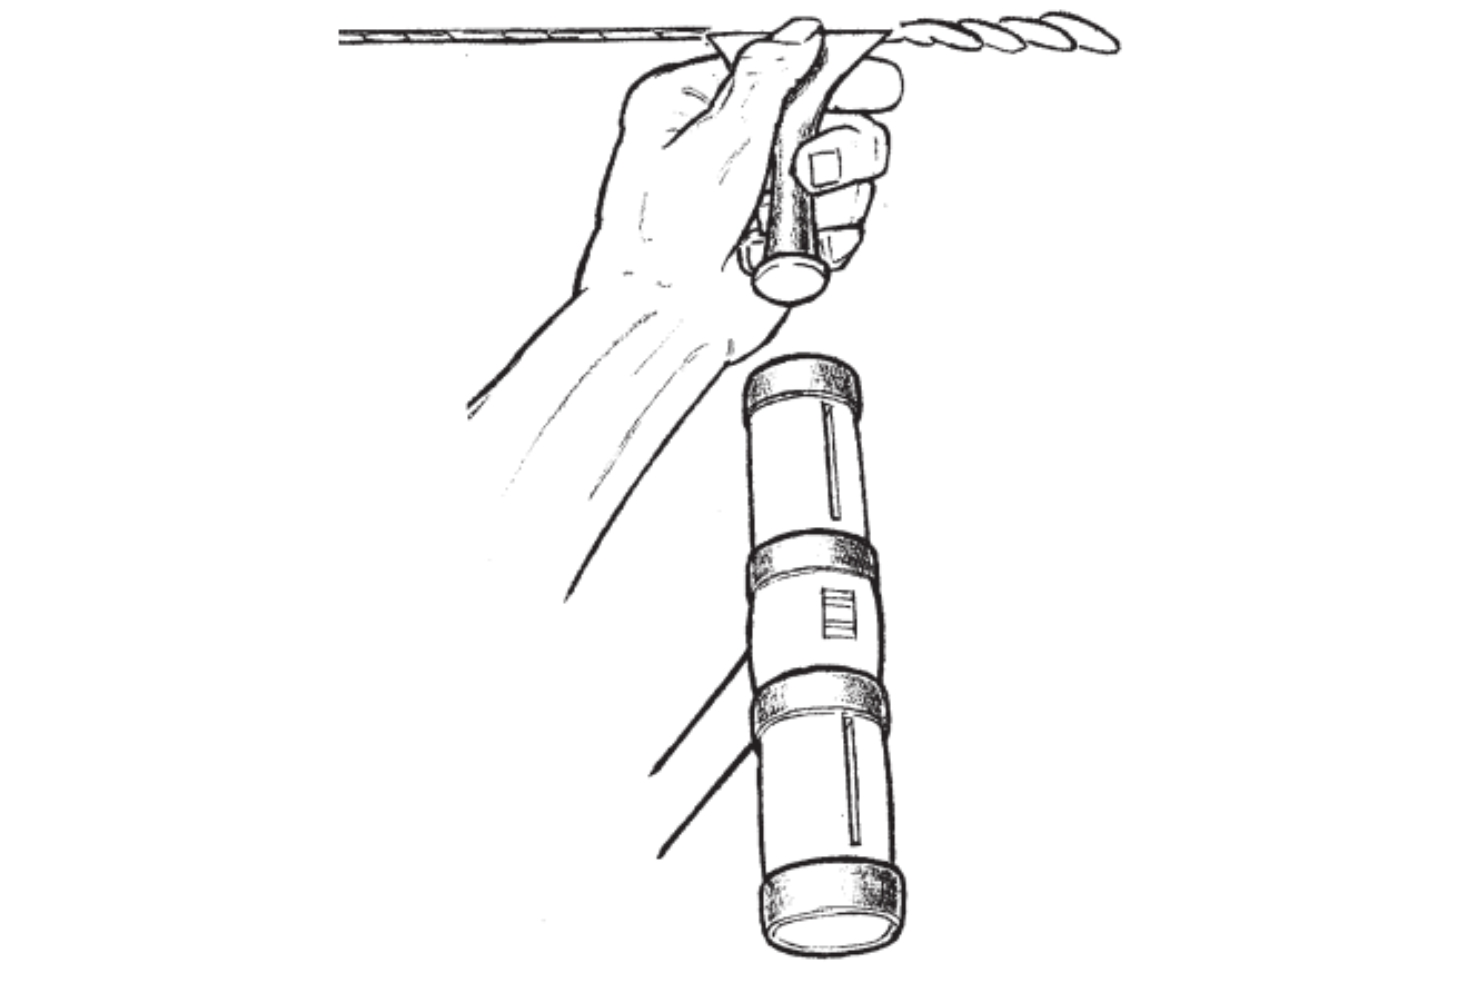
When caulking, one sits on the flat caulking stool next to the seam on deck with legs stretched out in the direction of the seam. The making-up iron is placed in the outstretched flat hand and held with the thumb, so do not make a fist! The hammer is likewise not held with the fist; instead the thumb lies on the handle for better guidance.
The blow is made with a loose wrist. Under no circumstances strike as if one wanted to drive in nails! The hammer weight does it!
Now the strand is not simply laid lengthwise into the seam but “set” in bights. For this, the wider irons often used abroad are not as well suited as our narrower German ones, which give shorter bights and thereby achieve a better seal. Then the strand is “set away” with the making-up iron and afterwards followed with the seam-setter. This work process is repeated always by arm's length, and one always works away from oneself. One must always fill the seam evenly, so that there are no mountains and valleys.
So that the matter slides better, one has an empty sardine tin with some oakum and machine oil with one. Into this one dips the caulking iron now and then.
If one is standing in front of the outer skin or crouching under the floor, then one ties a piece of bacon rind to the wrist and greases the iron with it now and then. Because during caulking the deck is wedged up, one must first have provided the entire surface with one strand before beginning with the second.
If the ball is used up or the strand has torn off, the new start must be connected with the strand lying in place, otherwise defective spots arise.
Around corners, such as for example butts (these are the blunt plank tips that are let into the covering board), the strand is to be led around. One calculates one strand per inch of plank thickness, but at least two. In any case it is better to take thinner strands and rather one more of them.
The sides of the deck and outer-skin planks are beveled over ⅔ of the plank thickness. The lower or inner third remains right-angled. This creates the seams. The first strand adheres very lightly in this right-angled third, under no circumstances drive through! One must pay attention to that!
As long as the caulking sounds like “flop”, the oakum is still compressing away. If one hears a deep “boom”, then the seam stands. A good centimeter of the seam must remain free for taking up the pitch. Caulking is a matter of feeling. One notices this when thin planks are to be caulked, or when one is dealing with old ships. With them it occurs more often that the fastenings have loosened, or that the seams have dried open. Then one must set the strand in very short bights and compress it well. This is achieved by always working away from oneself. And with feeling, with feeling!
Deck and outer skin must not only be recaulked when one discovers a leak, but also when the pitch has crumbled over time, or the oakum has worked itself out of the seams. One then takes caulking mallet and suitable seam-setter and checks whether the contents of the seam can be compressed away far enough that one can lay a strand over it. If enough space is present, one drives a layer over it and repitches. If the seams are full, perhaps because someone else already had this glorious idea, the old caulking is knocked or torn out by means of spanjer or “rieter”. The rieter is a simple rod with handle and crooked point.
But what does one do if seams lie so wide open that one could throw a cap through them?
The professional boatman would now scrap his ship, but with our use that is not yet necessary. One can nail seam battens in front from the inside. In the width of the seam battens, white lead is smeared onto the planks (or thick varnish etc.), then a thin strip of tar felt, roofing felt or nettle cloth is laid on it and the seam battens are likewise smeared and then nailed. One can also plank on a second outer skin. What one must not do is a plastic coating!
Old decks that have worked themselves apart, their seams can be nailed with schmarting. If possible, one mills or chisels a wide groove into the seam and then nails canvas strips over it. For this one uses cut copper nails. This procedure is likely known from fish-hold and inland-vessel hatch covers. One can also, if it does not interfere, nail the strips over it without a groove, that is flat. This type was formerly used on the north German coast even on new builds.
Pitching
The pitch has only the task of closing the seam so that no oakum can fray out. Pitch complements wood because it works oppositely.
We do speak of “cooking pitch”, but pitch must by no means boil, because the bubbles that form in the process leave holes after cooling. The pitch must simmer.
The pitch kettle is set up near the surface to be pitched, because the pitch cools quickly. The seam should be well filled, but if possible not overflow. Therefore preferably pour once before and then after. Pitch that stands proud is removed after a few days with the familiar pitch scraper. But in such a way that the pitch does not break out and also the wood is not damaged. If it should be necessary, the surface is planed with the “ossen”, but long strokes! Do not take the double plane and out of laziness clean only small areas, that gives dents and on deck eternal puddles. There it leaks and rots first.
Caulking and above all pitching under the floor is difficult. Formerly the ships were careened on the bank for this purpose, i.e. laid on the side. In order to “conjure” the pitch into these seams, the ship's carpenters struck themselves a pint from thin cordage (have the sailmaker show it and try to make it yourself). With this pint the liquid pitch was brushed into the seams. One can also putty the seams. Then they must be primed with varnish and of course be dry. The modern sealants developed by chemistry are not discussed in more detail here. We should give our old ships what they are used to.
Whoever has drunk schnapps and beer all his life does not slurp Coca Cola or Fanta in his old days!
What has been said so far also applies to boats, only because the seams are finer, one takes cotton threads and closes with putty. At most for the keel rabbet one takes oakum. One also leaves the caulking mallet aside and strikes with the round wooden mallet, not with the angular knocking wood!
And now it can get going! But with feeling, I tell you!
Fiedrich Brunner
Solid wood mast manufacturing
by Joachim Kaiser
- Design and dimensioning
- Selection and condition of the wood
- The required tools
- From tree trunk to squared timber
- From squared timber to round timber
- Finishing work and care
The construction of a mast from solid wood
The shape and dimensions of the masts of different types of sailing vessels can vary greatly, even though the deviations always remain within certain limits. In addition to type-specific differences, the intended purpose and area of use of the individual vessel also always play a role. Vessels that operate mainly in areas with little wind were always rigged with higher masts than heavy-weather vessels; a lightly built cutter yacht always has considerably lighter spars than a fishing vessel of the same size, on whose mast the full net sacks must be hoisted out of the water. The spars reach extreme strengths, for example, on the Colin Archer rescue cutters: these vessels served to beat up against an offshore gale with 3 - 4 Nordland boats in tow until under the protection of the coast. Flat-bottomed vessels, with their high initial stability, also usually have stronger masts than keel vessels of the same size, which respond more softly to wind pressure.
While the mast height ultimately differs from ship to ship, something more precise can be said about the strength. One starts here from the beam B of the vessel and calculates the greatest thickness of the mainmast (d) from the following simple formula:
(B x 6) x 100 = d.
In words: One multiplies the beam of the vessel in meters by 6 and obtains the mast strength in centimeters. This formula is no more than a guideline; according to the requirements and characteristics listed above, the mast strength may deviate from this formula value. With the old ships still sailing today, which after all no longer work under authentic conditions, one hardly needs to exceed this value, rather to fall below it. Thus, for a tabernacle mast whose lower mast is post-shaped and built almost without taper, one can go down from the factor 6 to 5.5. The relation between small differences in diameter and corresponding differences in cross-sectional areas (and thus breaking strength) is shown here by two short examples:
The area difference between a 20- and a 22-centimeter mast is 66 cm², which in turn corresponds to a difference of 22%. 66 cm² would be the cross-sectional area of a spar of 9.2 cm diameter! If a mast is to be twice as strong - in terms of theoretical breaking strength - as, for example, one of 20 cm diameter, it would have to be 28.3 cm thick (and not 40 cm). The formula for calculating a circular area is F= r ² x 3.14.
For the dimensioning of other spars (booms, gaffs, yards), one starts from the following formula:
Boom length in meters x 2 - 2.2 = greatest diameter in centimeters.
Since such spars usually have a stronger taper than a post mast, the diameter at the boom ends can be up to 30 % smaller. For the boom, the stronger end is chosen toward the clew aft, while the gaff has its stronger end at the jaws.
Finally, the quality and type of wood also influence the thickness measurements. A spruce mast should quietly be somewhat thicker than a larch or pine mast. If, on the other hand, one is in the fortunate position of being able to work with pitch pine or Oregon, all thicknesses can be taken 10% smaller compared with the usual softwoods.
Selection and condition of the wood
The choice of wood species will almost always have to depend on the types available nearby, since the transport of individual long trunks over longer distances can become more expensive than the wood itself.
In our latitudes, spruce, fir, pine, larch, Douglas fir usually come into question.
If one had all these types to choose from, it would be difficult to say which wood one should best take. An evenly grown larch is certainly a very good mast timber, but in larger dimensions it is not easy to obtain. Japanese (fast-growing) larch should not be taken, but only European. Problems occur with some larches because of their tendency to spiral grain - some freshly worked trunks, and not only larches, twist so far while drying that the top can later point up to 20° out of the ship's center! This is said not to happen so easily with Douglas fir, whose wood is otherwise also gladly used, especially for extremely high masts. Pine timbers can differ quite considerably among themselves; a good type in any case produces a very beautiful mast. With fir wood there are said to be occasional difficulties with dead knots. The simplest and cheapest to obtain is spruce wood, which in its capability is even superior to some other softwoods and is also one of the lightest types of wood. Because of its lower resin content, spruce is less weather-resistant than the other softwoods, but here it depends very much on the individual tree and also on the care of the new mast. Poor care and treatment, especially in the first two years, can also ruin the best pitch pine mast prematurely.
Incidentally, pitch pine in particular, as a wood of excellent weather resistance, has a pitfall: Over longer periods it reacts sensitively to exclusion of air in connection with moisture and pressure, as well as to contact with ungalvanized iron. Thus old pitch pine masts are usually affected all around in the mast collar, can begin to rot under the surface around hook bolts (gooseneck fittings!), under bolt plates and broad fittings, while all visible parts are still in the very best condition.
Important in selecting a tree is above all the soil on which it grows, as well as its immediate surroundings. One should never take trees that have grown in swampy, marshy areas - any kind of rapid growth has an adverse effect on elasticity and general wood quality. Fast-growing trees have large distances between the annual rings and are especially susceptible in swamp areas to heart rot and tree diseases. The more slowly a tree has grown, the better its wood is. Therefore one should get one's mast from a forest with stony or loamy ground. The Dutch, for example, on whose damp soils no reasonable woods can grow, prefer imported firs and pines from Norway or the Spessart; Nordic spruce with its closely spaced annual rings counts among the best woods for a mast.
The immediate surroundings of the tree also influence its growth. On steep slopes most trees tend to become crooked, which incidentally can also occur at forest edges. The slenderest, most even trees are always found in the middle of the forest among trees of approximately the same height. Solitary trees or trees towering above everything else are also said to be more susceptible to spiral grain, which can be recognized in many tree species by the course of the bark. In any case, the selection should not be undertaken without an experienced woodworker or forester who is better acquainted with his special tree species.
One will first be looking for straight growth and sufficient butt diameter. Whether a tree is somewhat crooked is noticed immediately when one lays one's head against the bark and sights along the trunk (which later during working is also the best check). To determine the height, many foresters use an angle-measuring device that works like a simple sextant; it is usually more difficult to judge whether a trunk that has sufficient length and sufficient strength at the butt also has enough flesh above in the area of the future top.
But it is precisely at this point that most mistakes are made. Laymen tend to select trunks according to the desired strength of the mast at eye height – inevitably the mast top then becomes too thin, a mistake that can no longer be corrected afterwards. Equally wrong is the other extreme - namely, out of sheer fear, wanting to buy a much too thick trunk. An aid in selecting the suitable trunk in the forest is the old rule of thumb of the foresters:
Per meter of height, the diameter of the trunk decreases by about 1 centimeter.
Most softwoods - and especially spruce - have their greatest toughness directly under the bark, while the heartwood breaks relatively easily; the pith has considerably lower longitudinal strength. One would therefore plane off the best part from a much too thick trunk. Especially when one wants to build a tabernacle mast that merges below into a square section, one is always tempted to choose a much too thick trunk in which the square section is still fully contained. In the interest of a more elastic mast and easier working, however, one should in case of doubt rather choose a smaller diameter and later glue on the missing corners of the square section. In any case, the best trunk is always the one from which the least has to be taken off. Attention must also be paid to whether the trunk is really round (except right at the bottom at the butt). If the core of the future mast does not lie properly in the middle, there can be nasty deformations during gradual drying. Also, because of the many knots, one should not let the future top extend too far into the crown of the tree.
There has already been much talk about the best time to fell the tree. Thus winter full-moon nights have already been mentioned, and it is often said that felling should take place after the second frost at the onset of winter. It is certainly true that the months November to the end of February are very favorable, because then all the sap in the tree has come to rest. Yet one also knows of trees felled in summer on which nothing disadvantageous was observed. Formerly, when people had more time and planned further ahead, the selected trunk was often made to die without felling it, and it was left standing in the forest for up to two years to dry out. This was achieved by removing a broad strip of bark all around the trunk well above the ground, often also an additional strip below the crown, whereby the sap transport comes to a halt.- Mention should also be made here of a forgotten method of considerably increasing the resin content of a tree before felling:
The trees from which the Vikings built their wooden stave churches, still preserved today, were limbed one year before felling to such an extent that only a small little fir tree ("brush") remained at the very top. This kept the tree just barely alive, and within a year a considerable amount of resin settled in the trunk. I know nothing about more recent experiments with this old method; it would be highly interesting to learn whether one can improve the quality of one's future mast in this way.
Before the tree is felled, ultimately little can be said about whether it has really grown without defects. Only when looking at both sawn-off trunk ends does one see whether it is free of red or blue rot, what shade and how strong a smell the wood has (which can provide information about the resin content). Just as many discussions as about the right time for felling are held about what should best be done with the freshly felled trunk. In the past, many swore by putting the mast timbers into water for about two years, preferably in slowly flowing fresh water. This achieved a washing out of the green sap from the fresh wood. That this treatment is optimal is disputed by no one today; many shipbuilders, however, think that it is not necessary.
But whoever can plan that far ahead should obtain his spars as early as possible and let them season, regardless of whether dry or wet. If one lets one's trunks float, they should only be turned occasionally. With dry storage, one must pay somewhat more attention:
- The trunk must lie on three to four trestles without sagging,
- ...must not be exposed to blazing sun
- ...and also not to wind, otherwise it will crack too much while drying.
In the shed or behind the shed, covered by a tarpaulin or roofing felt, which may well remain open at the bottom, the trunk dries out most evenly. The bark is only removed at the beginning of working. Just as harmful as sudden changes in temperature and humidity is lying on the ground. This is the surest means of getting blue rot and other infestation into the trunk.
The required tools
To remove the bark, one needs a bark plane or a similar device; the loosely sitting bark of seasoned trunks can also be chopped off with a broad chisel. To smooth rough branch stubs and the flares at the butt, one needs a sharp, handy bow saw (Swedish saw). With it one can also work out the first rough surfaces by sawing into the trunk every half meter to just before the future surface and then splitting off the wood between the saw cuts with a strong chisel (mortise chisel) or an adze (see below). A strong chisel together with a (wooden) chisel mallet is in any case kept at hand for all possible woodwork.
The less experienced self-builder is advised rather to carry out the rough preliminary work with this and to dispense with adze or side axe. The adze is a kind of axe with a transverse cutting edge; it serves mainly for cleaning up rough unevenness, bevels, etc. With the sharp cutting edge one chops a piece into the wood (or also into one's own shinbone) and breaks out a chip by pressing on the long handle (or breaks off the handle). It is most convenient to work with the adze when one has the workpiece below oneself between one's legs.
The inexperienced are emphatically warned against this tool.
More harmless, but today rather unknown, is the side axe - actually a normal axe, except that one side is worked completely flat (at the haft). With the side axe, vertical surfaces can be worked well when one stands above them.
Nowadays, however, the most important tool is the electric hand plane. When buying it, one should not be too petty and should acquire a device that does not dissolve halfway into warm plastic. One should have a pair of spare knives (HSS) with it and - especially important - ear protection. For the fine work, a belt sander can be put to good use. Whoever, however, can handle an angle grinder well, can also get quite far with a rubber backing pad and sanding discs of different grits. For finishing work, an orbital sander could then suffice. The most important measuring tool is the caliper (outside caliper). This device is best described as a pair of dividers with legs bent inward. The legs are folded together over the place of the trunk to be measured and the thickness is measured with the folding rule between the tips of the dividers after they have been removed again. With smaller diameters one can also use a large sliding caliper; otherwise, however, the outside caliper is irreplaceable and indispensable for this work.
Finally, for marking and checking, a firm thin cord is necessary. The classic chalk line with chalk does not always function quite properly in mast building, since the chalk line on the light, moist wood is poorly visible and does not last. Instead one can take drawing charcoal (charcoal), or a firm, thick felt-tip pen or carpenter's pencil.
From tree trunk to squared timber
After setting on trestles and removing the bark, the mast is carefully planed smooth from all sides until all coarser unevenness has disappeared. Afterwards, with eye and cord, one first gets an idea of how the trunk has actually grown exactly - stated more clearly:
How crooked it really is and where the individual curves sit.
As long as it is crooked only in one direction and not in several, such defects can often even be put to use. For actually only topmast lower masts and mizzen masts are built column-like and symmetrical, while the mainmasts on the small craft of Central and Northern Europe were predominantly shaped crooked. Specifically, the top of the mainmast was always worked down on its rear side, so that the mast received a forward-bent appearance. Since the uppermost mast section mainly had to absorb the strong tensile forces of the peak halyard, this was the logical form. This forward-bent appearance gradually became such a fashion among the small sailors that the yard people could in the end no longer build the masts crooked enough for the skippers. The unstayed masts were also usually crooked below deck; here too the rear side was usually worked down somewhat. Below deck, however, one has completely free rein. It is important only that the trunk has no significant curves in the future transverse direction of the ship, since warping will certainly occur later if these are worked away. Fore-and-aft warping either does not stand out in the bent stature of a mainmast or reinforces its characteristic appearance.
Once one has decided which side is to come to stand forward, one sets the mast on trestles with this side upward and aligns it exactly. When marking the two trunk ends, one first starts from an all-around symmetrical stature and tries to mark a square at top and bottom respectively, whose side lengths correspond to the future mast diameter. The core of the trunk should always also lie in the center of the square. Since this first figure does not yet contain any taper and the circumscribed square of the mast diameter with its corners runs beyond the trunk, one must use one's imagination somewhat here. But as long as even four possibly quite narrow surfaces would still result when planing this four-sided column, everything is in order.
At this point deviations from the originally intended measurements often occur. If the trunk is after all somewhat too thin - especially in the top - or so unfavorably curved that the intended diameters cannot be achieved, then it is necessary to think things through well once again. But as long as one stays within the tolerance limits mentioned above, one does not need to run back into the forest immediately.
The prerequisite is of course truly good wood quality. If, on the other hand, the mast is planned thinner than is necessary according to the available trunk, one should calmly leave a few centimeters more standing (whereby it must of course be considered that excess strength affects wind resistance and top-heaviness.
Once one has convinced oneself that the trunk yields roughly what one expects from it, the first surface is carefully worked. Measuring frequently, and repeatedly checking with cord and eye, one works one's way up to the perfectly straight surface (we are not speaking here of extremely crooked masts).
Then the mast is turned by 180° so that its later aft edge can be worked. With coarse tools and without paying attention to the exact millimeter, this side is now cleaned without consideration of the taper. One can now proceed in the same way with the two remaining sides before dealing with the curves, or one works the back side right away down to its final taper. The entire middle part of the mast, which corresponds approximately to the hoist of the gaff jaws, has hardly any taper anyway, that is, it tapers evenly and slightly, so that the cord can also be used here. To work out the taper, one takes the thickness measurements from the drawing at intervals of 0.5 - 1.0 m, marks them on the side or strikes the wood surface in correspondingly far with the chisel. The working down is done by eye; whoever is unsure should use a fairing batten, with whose help irregularities can be uncovered at once.
Once the back side has been worked down, the center is marked by chalk line and the course of the side surfaces is marked toward both sides, on the front and the back surface. These are likewise worked down to the line and all surfaces that absolutely must stand at right angles to one another are finished smooth. The result is now a (not everywhere full-edged) squared timber with taper.


From squared timber to round timber
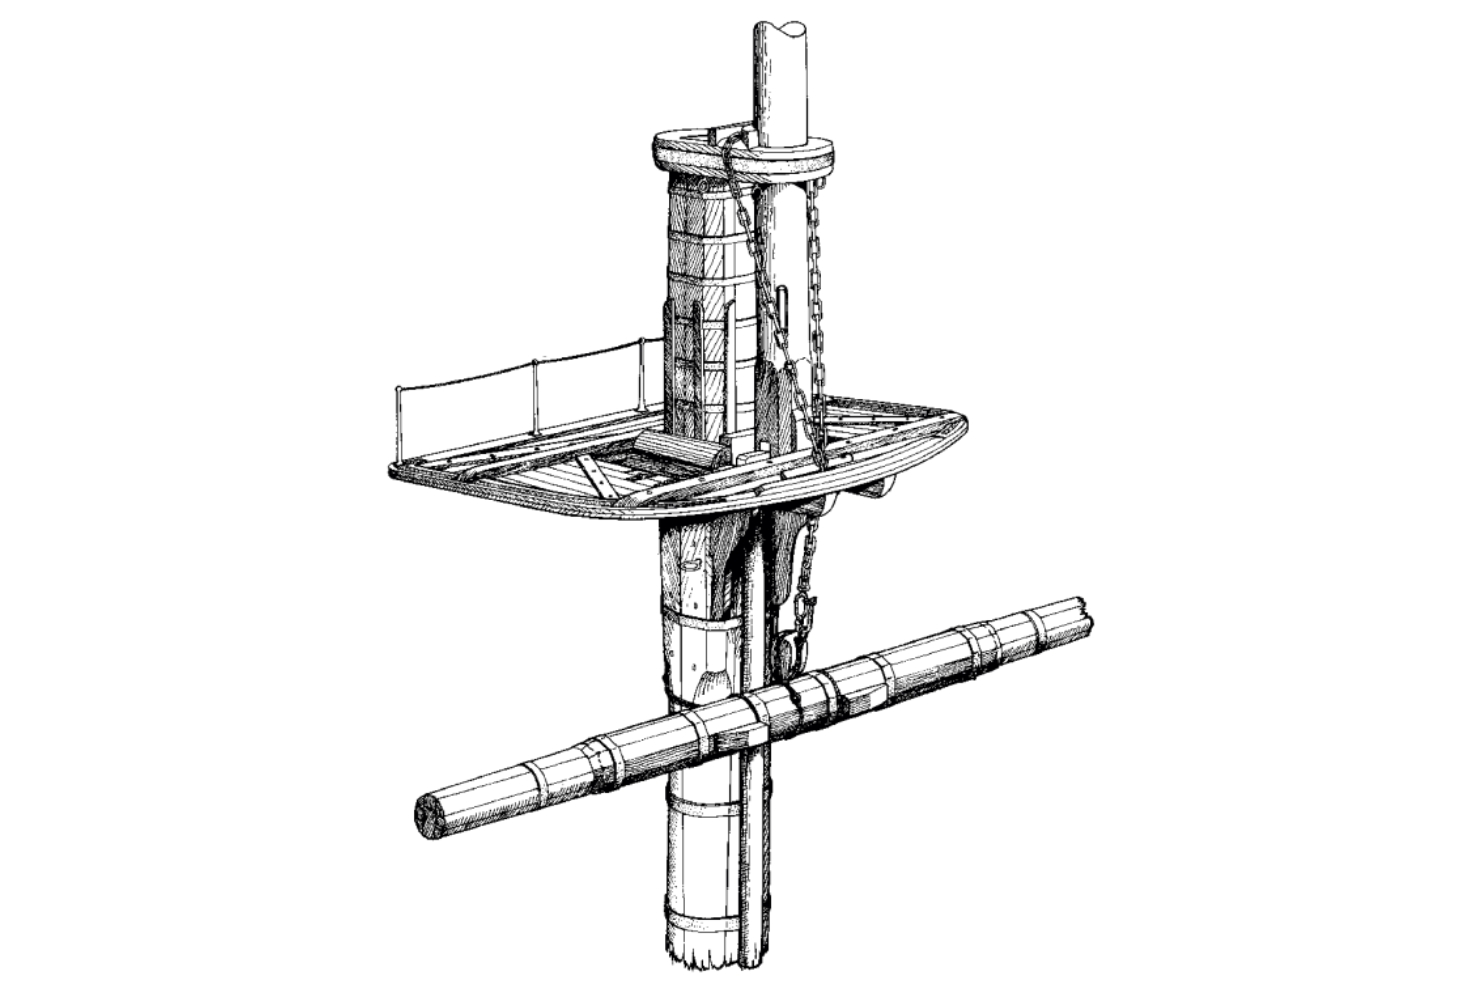
As the next measure, one must modify one or two of the mast trestles so that the mast can lie securely on its high edges or later as a round. This is achieved, for example, by two crossed boards or by a support beam with a V-shaped cutout. But before the square timber is placed on the high edge, a lengthy marking begins. First of all, the center line is marked on all four surfaces, on the straight ones with a chalk line, on the sides with cord and batten.
In order to get from the square to the octagon, one now marks off, at any number of points on all four surfaces, a measurement that can be calculated mentally with a rule of thumb. Specifically, at the point one wants to mark, one measures the mast diameter d (= side length of the square) with the caliper. This value, read in centimeters, is multiplied by two and marked off in millimeters on both sides of the respective center line. Once this has been done on all four surfaces and the new points are connected with one another by planing off the corners, one obtains a regular octagon with sufficient accuracy. It is expedient to mark all four sides one after another and to fair the lines through so that they are clearly visible, so that afterwards one can plane continuously without being distracted in between by mental work. When smoothing the octagonal surfaces, one should not proceed too inaccurately and should check the result here and there - namely whether the surfaces are of equal width all around. The rules of thumb according to which work is done here have the pitfall that they build on the correctness of the existing surfaces. If irregularities have been overlooked right at the beginning (wrong angles, surfaces of different widths), one may afterwards, despite following the rules, end up with an egg-shaped mast cross-section.
The path to the octagon is somewhat more difficult in that at one point - in the case of a tabernacle mast even at two - the square must remain, so that one can no longer sight along the mast quite so well with the eye. Every mast remains angular at the height of the shroud bearing (hummer, hounds), so that here the mast cheeks (calves) can be properly fastened. Toward the underside the square passes softly into the round, upward there is a sharp step that is later filled out by the shroud pads. The tabernacle mast remains angular in the area of the tabernacle; the square runs out directly above the tabernacle softly into the round.
With smaller diameters, therefore almost always with the spars, one can work the octagon round by eye (with favorable starting diameters and some skill, one will sometimes skip the angular intermediate stage entirely). Large diameters, however, still require the sixteen-sided form if the final result is really to become round. Again one takes one's outside caliper (caliper), folding rule, cord and pencil to hand and marks the course of the center line on all eight surfaces. From this, at any number of points, the following value is marked off on both sides by rule of thumb:
One measures the diameter of the trunk (d) in centimeters and marks it off in millimeters on both sides. From connecting the adjacent points or lines, a (more or less) regular sixteen-sided figure results. The width of its surfaces is quite exactly half the surface width of the octagon, but one should not use this relationship to mark off the values, since at this point existing inaccuracies would add up.
On the way from the octagon to the sixteen-sided figure, not too many chips fall anymore; from the sixteen-sided figure to the round, even fewer. Even if the craftsman is now itching to give his workpiece a furniture-smooth surface straight away, with the working method of a self-builder it is wiser to stop at this point. At most, the heel tenon could be worked out and perhaps also the lower mast, which is free of fittings, could already be brought into its final shape. Everywhere, however, where ring fittings are driven onto the mast, one should wait with the fine work until the fittings are finished. In this way it is much easier, despite unevenness on the mast and on the fittings, to drive them exactly to the place where they are to remain seated. And while the fittings are being worked on, the mast has some time to dry out. Only with this method can one prevent, with woods worked green, the ring fittings from sitting 25 centimeters lower after the first sailing summer!


Finishing work and care
If one temporarily stops the surface work on the mast because of these considerations, measures must immediately be taken against cracking of the wood. From the freshly worked surfaces, an enormous amount of moisture escapes, while the layers beneath lose only very little. Drying wood, however, shrinks not insignificantly; tensions arise and the surface cracks (wind cracks). Especially in the warm season this process takes place very quickly, which is why it is better to build a mast in the cool season. Cracking can be prevented or at least limited by protecting the mast from the direct effects of sun, heat, rain and wind. Large masts are naturally mostly built outdoors, so here only careful covering helps.
Good results have been achieved with a long, narrow tarpaulin that was fastened over the mast and open at the bottom (without being able to blow upward). In this way, under solar radiation, a moisture bell formed under the tarpaulin, which prevented drying too quickly. It is especially important, however, to seal the wood surface as far as possible immediately after stopping the woodwork - with thin wood stain (Bondex, Benar oil, Owatrol), with diluted linseed oil varnish or diluted clear varnish. Applied twice in close succession in strong dilution, this, together with the covering, is the most effective protection against cracking. When it comes to the final work, the stain is sanded or planed down again.
Another word about the ring fittings: On the roughly worked mast, their seat is marked; with the caliper one then determines the smallest diameter at this point (one will almost always find that, despite precise work, the mast is not evenly round everywhere). The fittings are made according to this determined diameter. As a rule, they also do not become completely round and true to size; the galvanizing shop finally adds another half millimeter to the inside dimension.
At least the uppermost fitting must - exactly like the mast top - be worked somewhat conically; it is better if all of them are, even if only at their lower end. For a blacksmith this should be no problem; a locksmith will probably see a difficulty in this. He must then at least grind or file the lower inner edge of the ring fitting in such a way that the wood is not damaged when the fitting is driven on and thin shavings curl up in front of the fitting. When driving on the fitting, after each fitting the mast is worked for so long (with finer tools such as rasp, file and finally sandpaper) until the fitting can be pushed to just before the line. The last piece is driven onto the wood, after the mast has been properly greased, by simultaneously striking with two heavy hammers, until it no longer moves. In order not to damage the zinc surface, hardwood or a copper hammer is held in between. I would only screw the fitting tight after the first sailing summer - then it should no longer slide further downward. On spars without conical taper, ring fittings are made to hold by setting and fastening three small pieces of metal around the mast in such a way that the fitting can first slide over them, but farther down comes to sit on them. In the end of a spar, a shoulder is often worked in (an abrupt reduction of diameter all around), above which the fitting, likewise worked conically, comes to sit without being able to slip (of course it must not sit loosely). Ring fittings also have the function of preventing the mast from splitting at its ends under heavy loads. Therefore, at the very top (topsail or topping lift) and also right at the bottom at the mast foot, a tightly driven-on ring fitting must always sit. Such fittings were formerly called driving bands.
The mast cheeks (calves) and shroud pads are made from oak or other hardwood. The calves lie with their entire surface against the mast left square. Here it must be noted that they are somewhat let into the mast toward the bottom; their inner surfaces - seen in an exaggerated way - converge somewhat downward. Depending on the mast strength, they are let in about 0.2 - 0.5 cm deep; their lower edge therefore sits on a shoulder of exactly this depth. This is of particular importance for holding. After gluing on and hardening of the cheeks, these are reinforced by three clinch bolts (if necessary also through screw bolts). The shroud pads lie on the square and the calves and nestle from both sides against the round of the upper mast. Their outer edges are softly rounded so that the shroud loops are not bent too abruptly. The shroud pad, so that it remains replaceable, is set on only with grease or tar and fastened with one - two screws.
Immediately after its craft completion, the mast must again be properly treated with oil or stain. One should under no circumstances varnish a green mast - one would thereby create a well-sealed center of rot (soft rot, blue rot, dry rot, etc.). Right at the beginning, a coat of poison (Xylamon) is never wrong; the next coat could consist of diluted linseed oil (not varnish!), perhaps mixed with some wood tar. As soon as this tincture has been absorbed into the wood, at least five coats of wood stain should follow (see above). Owatrol offers a program that begins with the raw wood and ends with other stains on the finished surface (Owatrol D1 & D2). One should always keep in mind that a gaff mast is exposed to some surface stresses through the abrasion of gaff jaws, parrals or mast hoops, which makes especially good soaking and priming of the wood seem important. Often good results can be achieved by combining old and new methods - first linseed oil and wood tar, then open-pored stains such as those from Owatrol. The care in the first and perhaps also in the second year determines the service life of the mast. If one lets it turn black for lack of preservation, it absorbs especially much heat under solar radiation and cracks especially deeply. I have already seen cracks gaping so far that one could push one's hand almost to the core.
Wind cracks cannot be eliminated again by any power in the world. The deeper they go and the wider they gape, the more rot-promoting substances can collect in them. Smaller wind cracks are actually no cause for concern; with a well-maintained mast they do no harm. The most effective countermeasure is once again an old, proven one:
One pours hot beef tallow into the cracks. This must of course be done on the lying spar. Because beef tallow becomes crumbly in the cold - one knows it, for example, from titmouse rings - one simply mixes it with some yellow lubricating grease (stern-tube grease). This not only makes it more pliable, but also better matches the wood in color. An addition of 10 - 15 % always seemed sufficient to me; if too much is added, the mixture becomes liquid too quickly in summer and leaks out. One must always reckon with this anyway, especially if the cracks are over 8 mm wide. Apart from the fact that it seals the cracks, the tallow also has a preservative effect; the lighter components penetrate into the surrounding wood, the remaining rest takes on a resinous structure and no longer becomes liquid even in warmth. In any case, the filling can be painted over without problems, e.g. with Benar oil, and is even refreshed by it.
One cannot warn enough against other attempts, for example injecting with plastic compound. In periods of moisture, spars swell so considerably that the wind cracks can narrow by millimeters. The plastic is then squeezed out and protrudes beyond the surface like ugly varicose veins. If one then cuts it off, nothing remains in dry periods, and one can observe that the plastic detaches sideways from the crack edges. Water can penetrate again, and in the shelter of the plastic residues the inevitable rot germs then thrive especially splendidly. Even worse is filling with putty - the hardened putty does not give way with moisture-related expansion and thus leads to the gradual widening of crack formation. In any case, the water eventually finds its way into newly formed crevices and begins its destructive work with frost and rot. With wide wind cracks, one will have no other choice than to chisel or mill them open and glue in a strip. One does well to take a softer wood for this and to fill the spaces behind it with beef tallow as described above.
But to accept the sixfold effort of a glued mast because of fear of a few wind cracks is - at least from my point of view - somewhat contradictory. For this, a tree is cut into nothing but long timbers, planed and milled with the greatest effort, glued back together on a mast bench with expensive glues and 125 screw clamps, then planed down again like a solid wood mast - all for a few percent weight savings or more strength, for electric cables in the middle and because of a few wind cracks - certainly appropriate for classic yachts, but not for a traditional working sailer.
This text was written by Joachim Kaiser. The author provides the text to you free of charge in order to contribute to the preservation and transmission of traditional craft knowledge.
If the text has helped you, we warmly ask you for a donation to the Friends’ Association Rigmor von Glückstadt e. V.
- IBAN: DE51 2225 0020 0021 0502 02
- BIC: NOLADE21WHO
- Sparkasse Westholstein
Das Vernieten von Kupfernägeln
Schritt 1

Schritt 2

Schritt 3

Schritt 4

Schritt 5

Schritt 6

Schritt 7